|
Diorama in fine scale 1:265

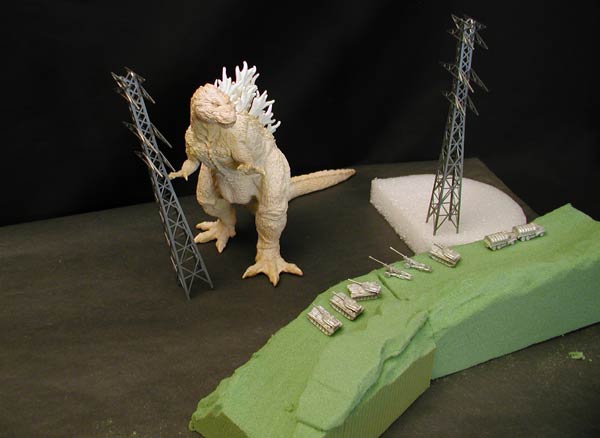
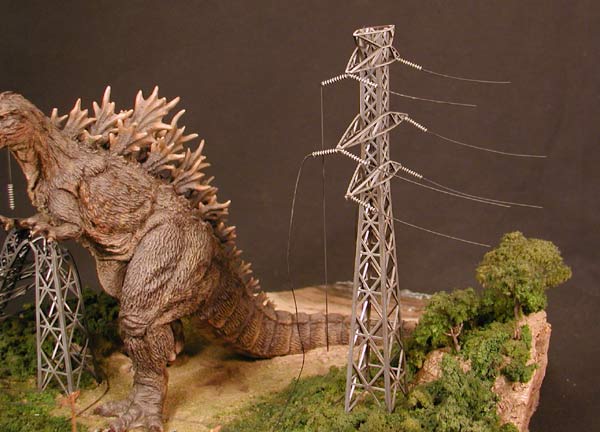
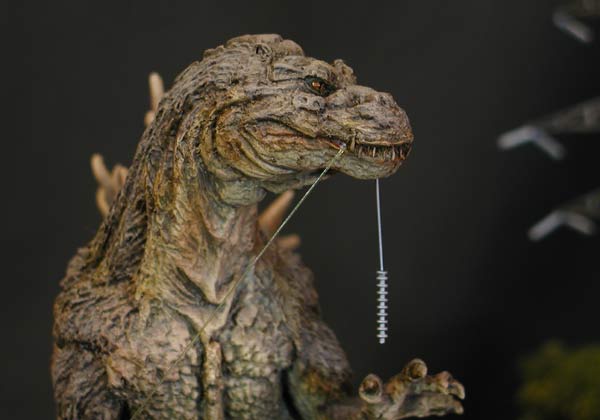
Here, inspiration was the motivator for this diorama. Kaiyodo's Godzilla ,sculpted by Shinobu Matsumura, is a very original take on the Japanese giant. The posture and expression of this kit , as well as a scene from the original 1954 film involving transmission towers,and military, helped me to draw this scene in my head.
I customized the model by removing the original dorsal fins with a pliers and dremel and replaced them with fins from another Godzilla kit. This was more to my liking, and I thought it gave the monster a more balanced look. To give the scene an interesting contour, I viewed several Japanese monster films for reference, to find the type landscape I was looking for. It would have been easy to lay it out flat, but I wanted to play director, as though I was shooting the scene for the first time.
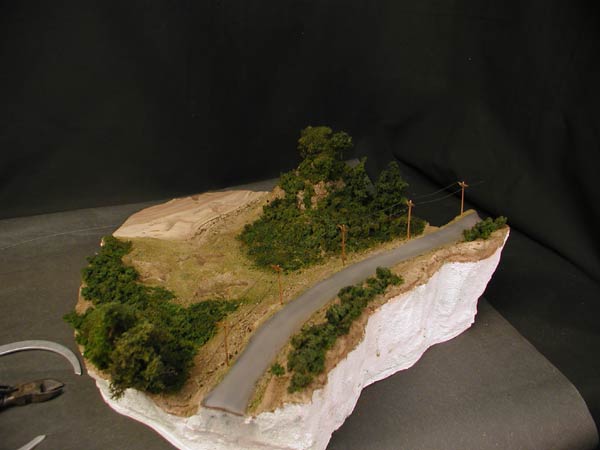
This scene is comprised of several useful effects, and techniques including: Trees and foliage. Earth, sand, and rocks. Water. Kit conversion. Scratch building. Since the model is only 7 1/2", I'll be scaling everything off 1:265 Micro Armor war gaming miniatures. For over sized transmission towers, N scale model railroads kits by Kato will be used. My technique for creating bases is to use sheets of open cell Styrofoam, or floral foam (dry). (These can be purchased at your local craft shop). On some occasions, I'll use wood for larger heavier pieces.
I like to shape the base around the scene, not to be forced to fill space on pre-cut wood plaques. Also; those shapes are boring are often look tacky ,especially when accompanied with some ornate picture frame edging them. To begin this project, I put together a mock-up of the scene by placing the models on an around scrap foam pieces . This important step brings me closer to the scene I envisioned. This also is a good step for adjustments and trimming down. Almost all my projects start off bigger than they end up. It's important to keeping the scene compact, but not squashed.
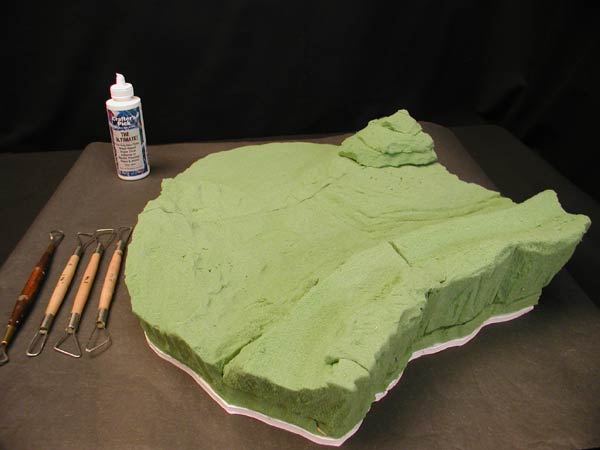
Working with floral foam open-cell Styrofoam, or floral foam could be used to shape the base. Since the scale is small, dry floral foam was my choice. The nice thing about floral foam is that it can formed into rough shapes very easily, either by pressing it with your hands, or working it with tools. The not-so nice part about it is that it's dusty, and messy. I recommend latex gloves, a good dust mask, and a shop-vac handy, so you can clean as you work. Here I used two , 2" thick sheets of floral foam pinned together with wood skewers, and carved out to the basic shape with a *Kemper R1 ribbon tool as well as *Wire End sculpting tools, removing a little at a time. Scraps and cut pieces were used to build up the hills and cliff face. The figure and towers were pressed in from time to time to aid the shaping of the base. Once I had the shape I wanted, I glued all sections and pieces with Crafters Pick adhesive, a great all-purpose glue that can be found at most craft shops. (An adhesive caulk would also do). To reinforce the bottom of the base, I traced the shape on to a sheet of foam-core board and glued that to the bottom .
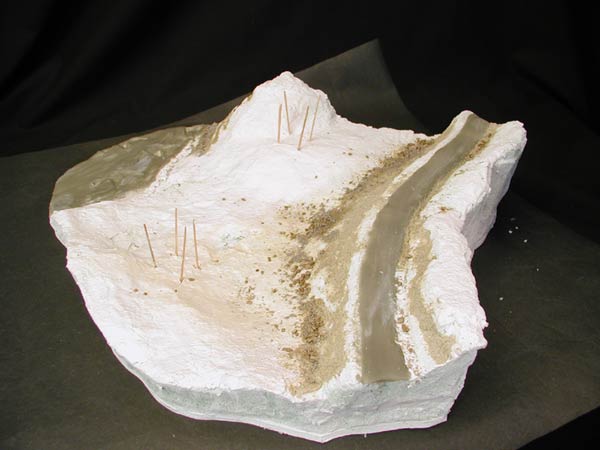
Floral foam needs to be sealed and strengthened before other landscape materials can added. Several coats of gesso were brushed on, the first coat mixed with a little denatured alcohol, so that it would penetrate deep into the foam. Before the final coat, Woodland Scenics Sub terrain Foam Putty was smoothed into all the part lines and divides with a small sculpting spatula. I planned a road for a line of military Armour. At this scale the texture of the road is not as important as its form. *Aves Apoxy Sculpt was rolled into a "snake" and place down the center of the path for the road. I carefully removed the putty to save the curve of the path, and rolled it flat with a rolling pin on a sheet of no-stick foil. (Wax paper will also do). I cut the basic shape of the road , keeping it a little wider, and placed of the path and trimmed to size. A sculpting tool was used to blend the edges, and fix any problem areas.
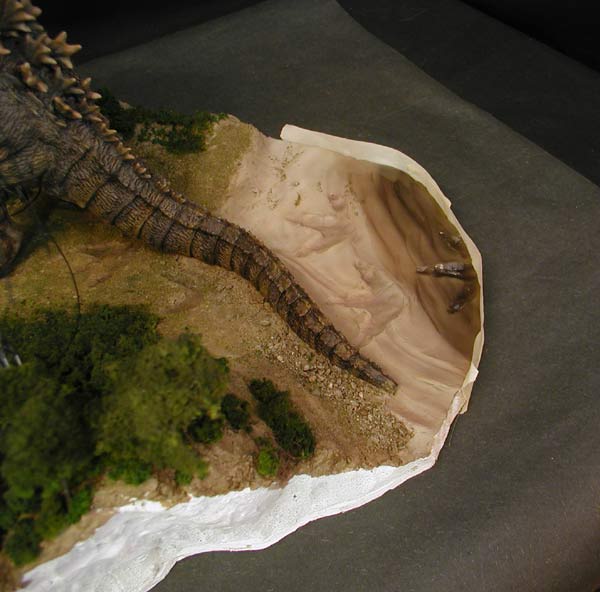
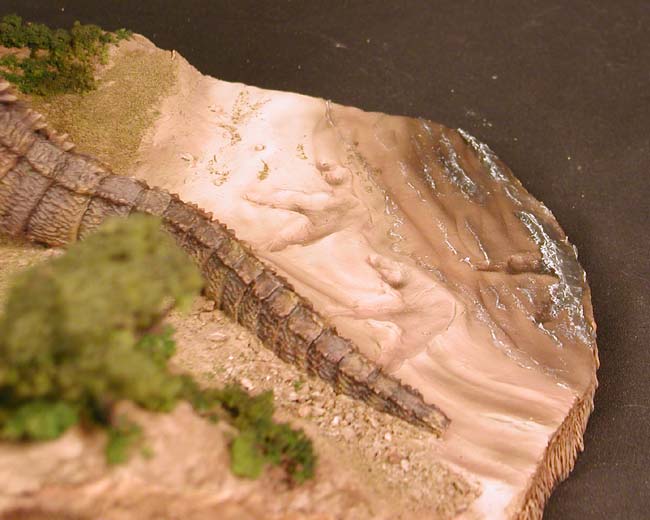
TERRAIN MATERIAL Before the landscape materials were added, tooth picks were used to mark the location of the towers. The first material for terrain texture I applied was a thin layer of *Amaco Scultamold.(*Celluclay is another product that works well). Military diorama expert Sheperd Paine has a method of adding white glue to Sculptamold when mixing it with water. I did the same here, working with a couple of small batches because the glue shortens the working time of the material. When applying the thick paste-like material, I used putty knives, spoons and spatula-like sculpting tools, dipping the tools in water to smooth out the material as I worked. With the material still wet, I wanted to press foot prints into the terrain. But I had already painted Zilla and didn't want paste all over the feet and tail, so here's a good tip: roll out a couple of thick pieces of polymer clay, and press the monster's feet in them to make print. Then mix up a small, thick batch of *Durhams water Putty, and pour it into the print. When cured, remove the clay from around the cast, and you now feet that you can use to create footprints. The scene has Godzilla coming out of the water and making landfall. A sandy beach was required. Again, at this scale the texture of the sand is not going to be evident; just it's form. I went back to the *Aves Apoxy Sculpt, creating ripple effects by placing a piece of plastic wrap over the putty, and working it with sculpting tools. It was smoothed out as needed with *Polly S airbrush thinner, and blending where the beach meets the land. (Water can be used, but it tends to make the putty a bit milky). The beach was taken out to the edge of the base.( Later, water effects will be added over about half of it). The cast feet were pressed into the beech sand, and the path created his sweeping tail were sculpted in as well, creating a dragged mound of earth and sand to the sweeping side of it. Texture for the eroded cliff faces was next added using *Wesco Quickstand applied with spatula sculpting tools, and blended to the edges with water. Various runs and grooves were added to the cliff faces with the make-up sponges and sculpting tools. Three grades of *Woodland Scenics model railroad Talas and Ballast were used to represent rocks and boulders at the bottom of the cliffs. Railroad modelers have established a time-tested and true technique for bonding loose rocks (and foliage) to terrain. To begin, fill a tall cup with warm tap water ( I used a plastic beverage cup) add a couple of drops of dish detergent (don't worry about being exact) and stir. This makes what is called "wetting agent". It's applied with an eyedropper over the rocks or foliage before the glue is added. This stops the "bonding agent" from beading up on the surface and allows it to soak into the material and ground work. Other products such as acrylic flow release for acrylic paint can be used in place of dish soap ( I've used both). Immediately after the "wet water" is applied, the "bonding agent" follows. Several options will work for a bonding agent including *Woodland Scenics" Scenic Cement". I make mine from one part *Modpodge matt (white) glue to three parts "wet water" mixed well. I apply this heavily to the area I'm gluing, really soaking it. If need be, I'll add more "wet water" over that , to allow the glue to penetrate.
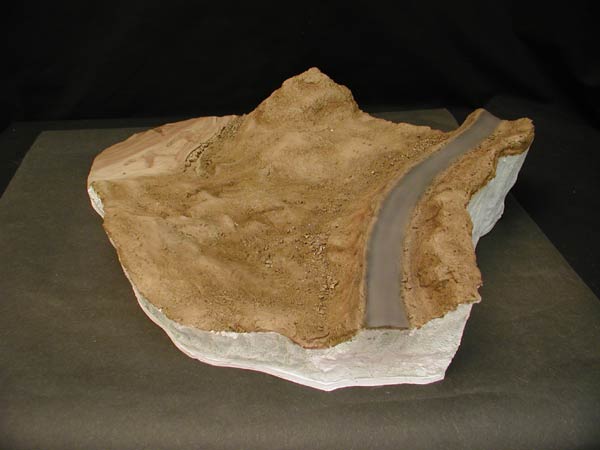
ADDING COLOR Before foliage can be added, earth color needs to be applied. my base coat for the earth color is to be *Polly Scale Earth (f414311), but since the color of the base is white, I would have had to lay down several coats. So, as to not use up most of the PS earth color on multiple layers, I brushed on an under-coat of earth colored craft acrylic, in this case *Folk Art "mushroom"(472). After this had dried, I brushed on a coat of PS earth color. I could have sprayed it as well, but there is something therapeutic about brushing by hand. Now, with my airbrush, a lighter earth tone was sprayed on all the raised areas using *Badger Freak Flex "Cursed Earth. An even lighter color was sprayed on to highest points using *Delta "Lichen Gray (02118). An added touch of color was added using a red earth color, in this case PS "Fresh Earth"(505240), sprayed into the recesses of the cliff face. Now, to tie the colors together, and add deep shadow to the recess, an oil color wash of Raw Umber and Odorless mineral spirits was brushed on. Most of time, I use oil washes as opposed to acrylic washes because oil washes fall right into the cracks and crevices without beading up on the surface, and feather out much nicer than acrylic washes without leaving a hard line. Also , there is something rich and earthy about oil color that is unmatched. After the wash has set up a bit, I wiped off some of the highest points with a tissue (gently), then let it dry completely (about twenty minutes). At this stage, I wanted to seal and protect the paint work thus far, so a coat of canned *Testors Dull Coat Laquer was sprayed on. Painting adjustments were made by spaying highlights here and there, as well as spot dry-brushings of the highlight colors. Remember, good paint work is rarely two or three steps and your done. Additional adjustments are usually in order. As my friend and fellow modeler Stan Hyde always says, "paint it until it looks right". I can't stress that enough. Beach sand has a very soft appearance to it , especially from a distance, so an airbrush is a must for painting the beach area. The same PS earth was the base color. The first highlight color sprayed was *Plaid "mushroom" (472) followed by Plaid "linen"(420). These craft colors have a very "soft" look to them when sprayed, which adds to the effect well. To indicate wet sand Delta "dark burnt umber" (02527) was mixed with Plaid " mushroom" and sprayed into the footprints and tail path as well as where water effects will be added. The road was painted with a base of Plaid "charcoal grey" lightened with white. Delta "lichen gray" was sprayed to highlight, followed by a raw umber oil wash to deepen the shadow. Later, road wear and tire marks were made by grinding black chalk pastel onto sandpaper and streaked on with the wedge of a flat brush. Remember that pastels need to be sealed. ( I used Testors Dull coat).
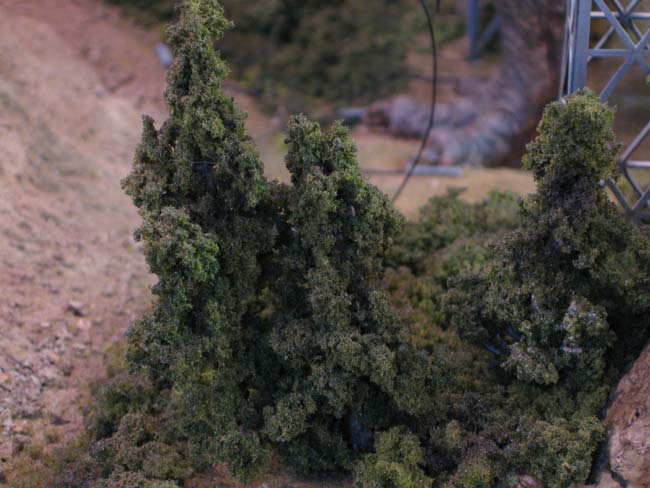
TREES AND FOLIAGE In this scale, trees models are quite small. I used a several techniques to construct these. The first and simplest method was using a an HO scale deciduous tree kit from "FALLER" that included tree armatures and medium green foliage material. The armatures were too big for this scale, and had to be cut at the branches. These branches were twisted into a natural form and were used as the main trunk of the tree. In some cases , other cut pieces of armature were glued with CA to these trunk sections to add variation. If blending was needed, *Golden acrylic "Molding Paste" was brushed into the joint, and blended outward. These were painted tan, and oil washes of Burnt Sienna and Raw Umber were added. For some, *Lichen was cut and glued to top tree portions to fill them out. This lichen was later sprayed with a brown to darken it. For pine trees,an HO armature was kit also used, this time cutting the top portion, and twisting it to form. Another method I used for tree armatures was natural growths. Roots dug up in the woods after a rainy spell work great for a natural looking tree. After drying out, these were cut and glued with CA to form different sizes and shapes. To paint, just washes were used. For both armature types, stick-pins were pushed into the bottom of the trunks. The roots just pressed in with a needle nose pliers and for the plastic trees, the pin was heated over a candle and melted in. Tree foliage was applied using *Woodland Scenics light and medium green Foliage and Course turf sold in separate packs. To glue the material in place , I use a couple methods. One is a light touch with a can of *3M Super 77 spray adhesive and the other stippled-on contact cement. Both adhesives grab hold of the foliage, allowing me to stretch it around the tree. The pine trees used small broken up pieces of medium green WS clump foliage applied with a tweezers. I always make more trees than I'm going to need, so I can pick the best looking individuals and arrangements. Color adjustments will be made after all the trees and foliage are in place.
The first layer of foliage to be added to the groundwork are dustings of Woodland Scenics Turf powers. Earth, Burnt Grass, and Weeds were sifted through a tea leaf spoon (a salt shaker would do just as well) over portions of the ground work. The same process for bonding rocks described before was used for the powders. In some cases, like along the edge of the road, I brushed on the bonding solution (glue) , then carefully sprinkled on the foliage powder. More bonding agent was added on top of that. I used light and medium green Woodland Scenics "Clump Foliage", which is a course block of colored foam, to represent larger bushes and plant life. Pieces were pulled of the block and broken up by hand, then dipped into the matte bonding solution and placed on to the ground work with a larger tweezers. The tower models were put in to aid the placement of the foliage. Once I had some of the larger foliage in place, I started setting in trees, trying out different arrangements until I liked what I was seeing. At that point, I'd pull up each tree, and ad CA to the pin at the bottom. To tone down the garish color green of the foliage, *Life Tone Trans. black green was sprayed with an airbrush, and the tops were highlighted with yellow ocher and hauser lite green.
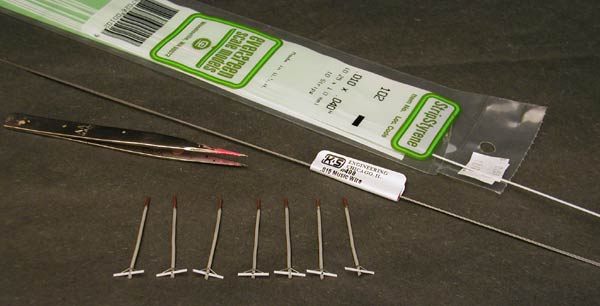
TELPHONE POLLS AND TRANSMISSION TOWERS There are times when accessories for a diorama cannot be purchased, and have to be scratch-built. To create telephone poles for the roadside, 12 gauge solid copper wire was stripped and cut to a length slightly longer than the required height ( to be pressed into the base) . The main cross brace to create the "T" were cut strips of *Evergreen Plastics #102 0.25 x 1.0 mm styrene strips, and glued into place the CA. The angeled supports for these were* K & S eng. .015 music wire, bent with a needle nose pliers and also glued in place with CA. After these poles were pressed and glued into place with CA , the same music wire was bent to a bow, cut and glued from pole to pole to create the running cable. Paint for the poles was tan with raw umber and burnt sienna oil washes. The running wire was dark gray with lighter gray oil dry-brushed on the top. Oil was used for the dry-brush technique because a light touch was needed and it feathers out nicely.
The giant sized transmission towers are *Kato n scale model railroad models These were assembled per instructions with *Tenax 7R plastic welder (recommended for all styrene models). There are options for straight or "V" cable holders. I chose the "V" . Since the plastic came in a realistic gray color, I worked off that spraying Golden Trans. shading grey from the underside, upward ( turning the model upside down) and dry-brushing lighter grays on the top. Black oil washes were used to define detail. Flat coat was sprayed to seal. To create the destroyed tower, two of the main supports were cut with wire cutters and the plastic was heated (slowly) with a hair dryer and bent to the desired (mangled) look.
For continuous running cable, 0.020 K&S wire was cut, bent to a bow and glued to the cable holders, for broken hanging cable, 26 gauge *Darice spool wire was used. For the stretched cable from his mouth to the tower, and the coiled and tangled cable, Cortland 816 bass fishing leader was used. This required the figure to be pegged at the feet and adhered into place. Then gluing , coiling , stretching and cutting of the leader was worked a little at a time. Spare cable repticles (from the tower models ) were glued on.
WATER EFFECTS Water at this scale is a pretty simple process because of the readily available materials. For this project, I began with *Woodland Scenics Realistic Water, which is a ready to pour liquid that dries clear. (This product can only be poured in 1/8th inch thickness at a time.) Before I began pouring, I darkened the area to be covered with burnt umber, building up transparent shades with my airbrush. Then taped the area off with masking tape, creating a dam. After pouring, the material needed to cure for 24 hours.
To create waves, I used Extra Heavy Gloss Gel Medium by *Talens. Transparent airbrush colors were mixed into the gel, in this case Paynes gray, black-green, and brown, but very little. This mixture was packed into a syringe, and laid down like caulk where I wanted waves to be. Then worked these with a flat brush to create the waves. To finish the waves, white was drybrushed on to the peaks for foam.
The final touch was to finish the sides of the base by troweling a thick mixture of Durhams Water Putty from the bottom, upward with a stiff brush and various flat knives. Earth colored paint and dark brown washes were applied.
|